| | Improve your grounding |  |
|
+11bubba53 foyota86 ChrisH JBFIREMAN WV Hot Rod Rhino T.Rhino Workhorserhino madmax 1 ASPENDELLROVER Firefighter SteveS 15 posters |
|
| Author | Message |
|---|
SteveS

Posts : 430
Join date : 2013-03-10
Age : 77
Location : Portland, OR
|  Subject: Improve your grounding Subject: Improve your grounding  Sun May 12, 2013 1:29 am Sun May 12, 2013 1:29 am | |
| There are frequent happenings of grounding wire problems that have been reported over the years. This usually shows up as an overheated wire or connector within a pigtail that originates at the battery negative terminal and plugs into a bullet connector that is on a short pigtail that comes out of the wire harness behind the battery. This circuit definitely will fry while you are cranking the engine, if the heavy black cable coming from the battery negative terminal has a poor connection at the far end, where it is bolted onto the engine case. I consider this a poor design, as the disconnected battery cable forces the starter motor current to find another path back to the negative terminal of the battery. This can destroy the wire harness and other light-weight wiring that may be in the pathway. Another weak point is that any current from any accessory loads that are grounded to the frame is forced to go through this small pigtail. So, large lighting or stereo systems grounded this way, rather than directly to the battery, tend to burn this circuit up. Step one of the solution is to disconnect the pigtail's quick connect and cut off the wire going to the battery. Put a matching bullet connector on the end of a black wire at least as big as the stock wiring and plug it into the connector on the pigtail coming out of the harness. Ground the other end of this new wire onto a known grounded frame member. Make sure that you create a good connection by scraping the paint off of the frame and smear everything with dielectric grease before assembling the connection. Beware that some frame members are simply bolted on and do not ensure a good electrical connection the the welded frame proper. This step creates a known good ground connection for the wire harness. The next step is to create a heavy duty ground connection for the frame itself. My preference is to ground the engine case to the frame, as this is a repeated failure point that has been reported. I recommend connecting a 10 gauge wire connection, from the same point that the heavy black cable is connected to the engine case, and tying that to the frame member under and alongside the engine. It can be difficult to find a chunk of real heavy wire, so a pair of 12 ga wires will be just as good, if not better. There is a threaded hole in the vicinity, that is used to anchor a tiedown loop for the radiator water tubing down there. Again, here you want to scrape the paint off of the frame and use the dielectric grease to ensure that you have a permanent electrical connection. Others have simply created a connection from the battery negative terminal to the frame member behind the battery. This does work at first glance. However, if it is done this way, it does not prevent the burning up of an unknown weakest wire that happens to be making the return circuit from engine case to the frame. For example, this might be the ground side connection for a sensor on the engine, or similar. The factory setup does not deliberately electrically connect the engine to the frame anywhere. The above suggested 'low road' approach does address this failure mode.  | |
|
| | |
Firefighter

Posts : 1337
Join date : 2013-03-10
Location : Arkansas
| | Subject: Re: Improve your grounding Sun May 12, 2013 1:34 am | |
| Excellent ! This is so very true and caused so many headaches. A little wiring can prevent a whole lot of issues.
Thanks Steve ! | |
|
| | |
ASPENDELLROVER

Posts : 1638
Join date : 2013-03-10
Age : 51
Location : CA
| | Subject: Re: Improve your grounding Sun May 12, 2013 2:15 am | |
| thanks Steve, I can always use electrical knowledge. I use the same cheap oil filter..lol...but I like | |
|
| | |
madmax 1

Posts : 1743
Join date : 2013-03-10
Age : 58
Location : frostburg md
| | Subject: Re: Improve your grounding Sun May 12, 2013 8:08 pm | |
| great post going to do this upgrade myself | |
|
| | |
Workhorserhino

Posts : 216
Join date : 2013-04-09
Location : SE PA
| | Subject: Re: Improve your grounding Sun May 12, 2013 8:33 pm | |
| This is very good advice, and well explained. The only thing I would add is use a star washer when bolting cable fast. Provides a little bite to it. The other is use the dieelectric grease over top the finished connection. I was told from a Cummins guru dieelectric grease doesn't conduct electricity. Or include it in a yearly maintinence program to clean it. | |
|
| | |
SteveS
Posts : 430
Join date : 2013-03-10
Age : 77
Location : Portland, OR
| | Subject: Re: Improve your grounding Sun May 12, 2013 9:03 pm | |
| - Workhorserhino wrote:
- This is very good advice, and well explained. The only thing I would add is use a star washer when bolting cable fast. Provides a little bite to it. The other is use the dieelectric grease over top the finished connection. I was told from a Cummins guru dieelectric grease doesn't conduct electricity. Or include it in a yearly maintinence program to clean it.
What really happens even with two peices of bare metal is that there are only the high spots touching (at the microscopic level) anyway. The low spots that are not actually touching are the pathway for air and water to get into the joint and form corrosion. What really happens with the grease in between is that it gets squeezed out as you clamp down on the joint, which makes those same high spots come together and make the same metal to metal electrical contact as without the grease. The grease is there in the low spots to seal those pathways that would promote internal corrosion. | |
|
| | |
T.Rhino

Posts : 1469
Join date : 2013-03-10
Age : 50
Location : Wayne county kenova WV
| | Subject: Re: Improve your grounding Sun May 12, 2013 9:09 pm | |
| Great info again thanks for the help. | |
|
| | |
WV Hot Rod Rhino
Admin

Posts : 2682
Join date : 2013-03-10
Age : 57
Location : Mt. Hope, WV
| | Subject: Re: Improve your grounding Sun May 12, 2013 9:10 pm | |
| good info!!...thanks for sharing | |
|
| | |
JBFIREMAN

Posts : 119
Join date : 2013-03-11
Location : IDAHO
| | Subject: Re: Improve your grounding Sun May 19, 2013 9:19 am | |
| | |
|
| | |
ChrisH

Posts : 475
Join date : 2013-03-10
Age : 42
Location : Texas (Victoria Area)
| | Subject: Re: Improve your grounding Mon May 20, 2013 7:13 pm | |
| You guys better listen to SteveS The grounding on these buggys are barely adequate. Mine burned up without any additional accessories. Check out what was left of the pigtail connector at the battery on my Rhino 700  Oh, and it gets even better. Not only did I smoke the ground at the battery negative terminal, but somehow it melted the ground at the voltage rectifier, too!  It melted wire way back into the main wiring harness. That was a pain in the butt to repair! I would not wish this on my worst enemy... 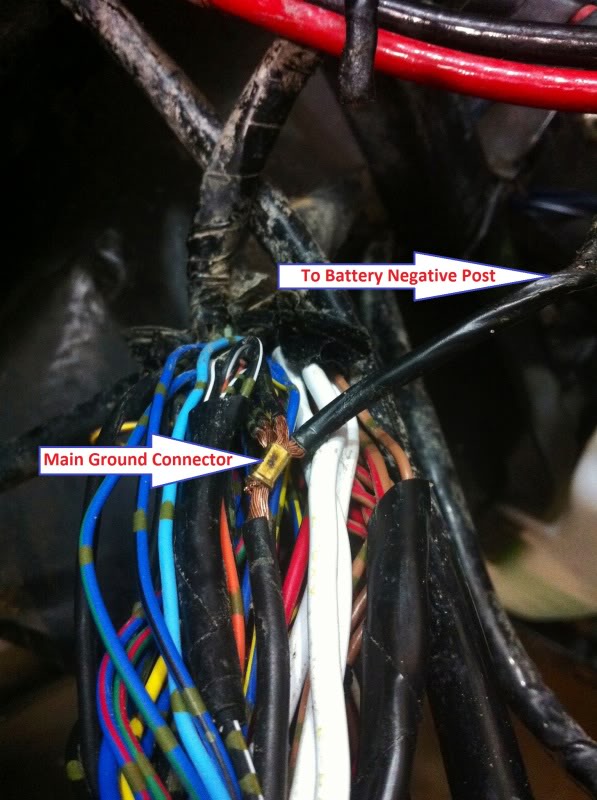   After I repaired the damaged wires, I upgraded the grounds as Steve recommends. I added a 6AWG wire from the motor to the frame, and another 6AWG wire from the battery negative terminal to the frame. No more problems.  | |
|
| | |
foyota86

Posts : 227
Join date : 2013-04-01
Age : 50
Location : TN
| | Subject: Re: Improve your grounding Mon May 20, 2013 7:36 pm | |
| | |
|
| | |
ChrisH
Posts : 475
Join date : 2013-03-10
Age : 42
Location : Texas (Victoria Area)
| | Subject: Re: Improve your grounding Mon May 20, 2013 7:47 pm | |
| The second pic is the rectifier grounding cable.
The third pic is what is inside the wiring harness, where the battery ground connects to the other ground wires. Sorry, I don't have the best electrical knowledge and language to describe this stuff. | |
|
| | |
madmax 1
Posts : 1743
Join date : 2013-03-10
Age : 58
Location : frostburg md
| | Subject: Re: Improve your grounding Mon May 20, 2013 9:30 pm | |
| good write up and pics better safe than sorry thanks for the info | |
|
| | |
bubba53

Posts : 117
Join date : 2013-04-07
Age : 70
Location : statesville,nc
| | Subject: Re: Improve your grounding Tue May 21, 2013 8:03 am | |
| | |
|
| | |
madmax 1
Posts : 1743
Join date : 2013-03-10
Age : 58
Location : frostburg md
| | Subject: Re: Improve your grounding Sun Jun 16, 2013 2:34 pm | |
| hey steves where is the pigtails quick connect and the wire I cut off going to the battery? i don't see any other wire with a bullet connector other than the green w/ white strip next to it i am confused | |
|
| | |
SteveS
Posts : 430
Join date : 2013-03-10
Age : 77
Location : Portland, OR
| | Subject: Re: Improve your grounding Sun Jun 16, 2013 4:00 pm | |
| - madmax 1 wrote:
- hey steves where is the pigtails quick connect and the wire I cut off going to the battery? i don't see any other wire with a bullet connector other than the green w/ white strip next to it i am confused
Oh, the pigtail (black wire) is up at the battery. There is a small black wire that is bundled (along with the black battery cable) into the lug that bolts onto the negative battery cable. You will find that black wire travels to the rear, where it meets a disconnect on a black wire that goes into the wire harness. If that small wiring is in good shape you can cut it off at where it goes onto the lug and connect it to the frame instead. You will then not have a ground connection to the battery until you do the heavy gauge wire hook-up from motor case to the frame down low as is shown in the picture. Sorry about the confusion, Here is a pix that I stole off of another site.....  | |
|
| | |
madmax 1
Posts : 1743
Join date : 2013-03-10
Age : 58
Location : frostburg md
| | Subject: Re: Improve your grounding Sun Jun 16, 2013 4:39 pm | |
| o i thought thats the one you ment but what is the green and yellow in your pic | |
|
| | |
madmax 1
Posts : 1743
Join date : 2013-03-10
Age : 58
Location : frostburg md
| | Subject: Re: Improve your grounding Sun Jun 16, 2013 4:43 pm | |
| or can i just ground it to the frame close to the battery or should i do it where you did your g/y wire | |
|
| | |
SteveS
Posts : 430
Join date : 2013-03-10
Age : 77
Location : Portland, OR
| | Subject: Re: Improve your grounding Sun Jun 16, 2013 4:57 pm | |
| - madmax 1 wrote:
- o i thought thats the one you ment but what is the green and yellow in your pic
- madmax 1 wrote:
- or can i just ground it to the frame close to the battery or should i do it where you did your g/y wire
That one is for grounding the green/white reverse switch wire should it fail. This fix has to do with the common problem where the reverse rev limiter kicks in at around 25 MPH. Green with yellow stripe was the closest match that I had. You can ground the pigtail wire anywhere that you have a good solid ground. The crossmember behind the battery would likely be a good point (the rectifier/regulator is grounded there I believe). Just make sure that whatever you are grounding to is electrically connected to the frame proper (not just bolted on, paint to paint surfaces). Scrape the paint off where you are making the connection and use some dielectric grease between the lug and frame to prevent future corrosion. What this combination of fixes is aiming to do is to improve the ground by using heavy gauge wire and also getting rid of a bad potential pathway for over-currenting the wimpy pigtail wire that Yamaha provided. | |
|
| | |
madmax 1
Posts : 1743
Join date : 2013-03-10
Age : 58
Location : frostburg md
| | Subject: Re: Improve your grounding Sun Jun 16, 2013 5:28 pm | |
| great thanks for all your help steve i really needed your help you are the man | |
|
| | |
SteveS
Posts : 430
Join date : 2013-03-10
Age : 77
Location : Portland, OR
| | Subject: Re: Improve your grounding Sun Jun 16, 2013 6:34 pm | |
| - madmax 1 wrote:
- great thanks for all your help steve i really needed your help you are the man
You are welcome. May your wiring live long and prosper.  | |
|
| | |
madmax 1
Posts : 1743
Join date : 2013-03-10
Age : 58
Location : frostburg md
| | Subject: Re: Improve your grounding Sun Jun 16, 2013 6:58 pm | |
| thanks steve it worked out great i feel safer now  | |
|
| | |
T.Rhino
Posts : 1469
Join date : 2013-03-10
Age : 50
Location : Wayne county kenova WV
| | Subject: Re: Improve your grounding Sun Jun 16, 2013 8:35 pm | |
| More great information from a great site thanks again. | |
|
| | |
chuddly

Posts : 710
Join date : 2013-03-13
Age : 43
Location : Eminence, IN
| | Subject: Re: Improve your grounding Thu Jun 27, 2013 7:41 am | |
| Steve....im a bit confused so i drew a diagram of what is going on in my head and if you could tell me if im right or wrong in my thinking that would be great. Excuse the crap drawing...its paint and i did it in like 30 seconds  | |
|
| | |
SteveS
Posts : 430
Join date : 2013-03-10
Age : 77
Location : Portland, OR
| | Subject: Re: Improve your grounding Thu Jun 27, 2013 12:39 pm | |
| - chuddly wrote:
- Steve....im a bit confused so i drew a diagram of what is going on in my head .......
I certainly cannot blame you, as it is difficult to describe it in words. I have annotated a snip of the service manual wiring diagram that pertains to the existing wiring. The markups are focused on the stock grounding scheme:  And.... Here is a markup of the wiring diagram that might help in visualizing what I am talking about regarding the changes:  I hope this helps? | |
|
| | |
Sponsored content
| | Subject: Re: Improve your grounding | |
| |
|
| | |
| | Improve your grounding | |
|


