| | Dealing with the Dust Devil behind you |  |
|
+10rhino727 08Rhino450SE Firefighter Stuntmanmike madmax 1 meats T.Rhino CUSTOMIZEDRHINO13 hymarker SteveS 14 posters |
| Author | Message |
|---|
SteveS

Posts : 430
Join date : 2013-03-10
Age : 77
Location : Portland, OR
|  Subject: Dealing with the Dust Devil behind you Subject: Dealing with the Dust Devil behind you  Fri Apr 26, 2013 12:32 am Fri Apr 26, 2013 12:32 am | |
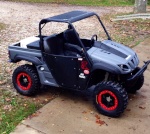
| "Dealing with the Dust Devil behind you" ....... Episode 1 Well, at least I have started collecting, hosting and organizing pix from long ago. First installment will involve the roof and what I call a 'Bikini Top' behind it. I've got probably approaching a dozen ' dust fixes' on my Rhino, large and small, so this might go on for some time, if it seems worthwhile for everyone. The idea here is to help diffuse the low pressure area above and behind the bed. This causes a rotating eddy of air flow which draws from the dust cloud behind the machine and brings it forward and down into the bed and cab. This low pressure region also draws dusty air up from underneath the machine through the gaps between the bed and back of the seats, as well as the myriad of gaps between seat, engine cover, etc. This is a subject for later episodes.  Here you see a panel constructed of heavy polyester fabric and heavy duty window screening. This is marketed as 'dog-proof' window screen, being made of heavy fiberglass mesh that has been rubber coated. It's practically bulletproof, for pellet gun calibers any way. The upper solid section is wrapped around a cross bar that spaces it away from the roof. The end of the panel is snap fastener attached to the panel to form a loop that hangs onto the bar. The bottom edge of the mesh section is sewn into a wide hem that provides an opening to capture a length of stiff, but bendy, tent pole rod. Ball bungies attach it to footman loops screwed into the top edge of the tailgate. So, it ends up being stretched tight but still quite easy to disengage at the rear, for access to the bed. Undoing the upper snap fasteners allows complete removal.  In this upward looking side/rear view, you see the gap between the leading edge of the panel and the smoothly downward curved rear of the roof. Moving air will tend to hug that curve and be drawn into the gap between panel and roof. Air that goes past that will encounter the solid fabric airfoil that presents itself. That air is deflected downward and tend to hug the leeward side of the panel. This deflection of the airflow will tend to 'feed' the low pressure area that would normally be caused by the passage of the machine through the air. The air that was pulled down between cab and panel will then be smoothly and evenly drawn through the mesh to further 'feed' the low pressure pocket. The idea here is to get the air flow behind the airfoil to be smooth and non-turbulent. We are trying to greatly reduce the low pressure area and smooth the flow such there is no rotating eddy of air close behind the cab. The air that is in front of the airfoil is at a relatively higher pressure than before because it is kept from freely moving away from the cab by the restriction of the screening. This makes for less suction to draw air in from below and from the sides. However, there is more to be done regarding the gaps which will be addressed in a later episode.  Shown here is the front of the cab. This is an Essex flip-up windshield with a few modifications. You see that, up at the top, the roof overhang presents a barrier to the air flow that is travelling up due to the slant of the windshield. This creates a high pressure pocket which feeds the ventilation holes at the top, above the hinged edge of the windshield proper. This creates a strong fan-like assist to air flow into the cab at speed. I have, since the picture was taken, added an inside hinged panel (much like a sun-screen in a car) that can be closed completely for winter riding. The lip on the roof also prevents rain from dripping into the cab, rather important here in Oregon. The roof is made from a sheet of Alucobond, which is a polyethylene plastic core faced on both sides with a thin sheet of aluminum. It is very stiff for its weight and easy to cut with woodworking tools. You can see parallel kerfs cut part way through the inside wall at the rear curve of the roll cage. This allows the sheet to smoothly bend to match the curve of the tubing.  This is a flow diagram to perhaps help visualize what is going on within the air stream. It is, of course, just a schematic, so don't take the kinks and bends in the arrows literally. I do much better operating a CAD program than I do with these graphic arts programs.
Last edited by SteveS on Sun Jul 14, 2013 2:49 pm; edited 1 time in total | |
|
| | |
hymarker

Posts : 295
Join date : 2013-03-10
Age : 43
Location : Hayden Idaho
| | Subject: Re: Dealing with the Dust Devil behind you Fri Apr 26, 2013 12:39 am | |
| | |
|
| | |
CUSTOMIZEDRHINO13

Posts : 1268
Join date : 2013-03-26
Age : 26
Location : Mariposa, CA
| | Subject: Re: Dealing with the Dust Devil behind you Fri Apr 26, 2013 1:53 am | |
| Wow that's awesome Steve, that looks like it has a lot of thought behind it! | |
|
| | |
T.Rhino
Posts : 1469
Join date : 2013-03-10
Age : 50
Location : Wayne county kenova WV
| | Subject: Re: Dealing with the Dust Devil behind you Fri Apr 26, 2013 7:12 am | |
| | |
|
| | |
meats

Posts : 227
Join date : 2013-03-11
Age : 44
Location : upper michigan
| | Subject: Re: Dealing with the Dust Devil behind you Fri Apr 26, 2013 8:45 am | |
| i might have to try this out if it ever warms up around here that would make it easier to grab refreshments while going down the road.  | |
|
| | |
madmax 1

Posts : 1743
Join date : 2013-03-10
Age : 58
Location : frostburg md
| | Subject: Re: Dealing with the Dust Devil behind you Fri Apr 26, 2013 8:50 am | |
| great info steve you never l let us down, also nice lookin ride | |
|
| | |
Stuntmanmike

Posts : 249
Join date : 2013-03-10
Age : 60
Location : Crestview, FL
| | Subject: Re: Dealing with the Dust Devil behind you Fri Apr 26, 2013 9:04 am | |
| Great write up steve! keep it going. | |
|
| | |
Firefighter

Posts : 1337
Join date : 2013-03-10
Location : Arkansas
| | Subject: Re: Dealing with the Dust Devil behind you Fri Apr 26, 2013 10:05 am | |
| Absolutely BRILLIANT ! Using the air flow to correct the problem that it causes in the first place.
Couple of things... By keeping the cab somewhat positive pressure air flow, it will even reduce the amount of dust entering from "other" places and help with exhaust fumes being pulled back in the cab.
With the slanted bikini top, You have some deflection for water or mud in the bed, shade for the bed and You can see through it !
Very well done Steve !
Last edited by Firefighter on Fri Apr 26, 2013 10:25 am; edited 1 time in total | |
|
| | |
08Rhino450SE

Posts : 789
Join date : 2013-03-10
Age : 70
Location : oHio
| | Subject: Re: Dealing with the Dust Devil behind you Fri Apr 26, 2013 10:22 am | |
| great write-up as usual, steve! constantly improving everything rhino  | |
|
| | |
rhino727

Posts : 1317
Join date : 2013-03-25
Age : 59
Location : musella,Ga.
| | Subject: Re: Dealing with the Dust Devil behind you Sat Apr 27, 2013 9:05 am | |
| great info an wright up very much thought went into it  X2 on what firefighter said keep it coming  love this site  | |
|
| | |
SteveS
Posts : 430
Join date : 2013-03-10
Age : 77
Location : Portland, OR
| | Subject: Re: Dealing with the Dust Devil behind you Sun May 26, 2013 10:52 pm | |
| Ahhhh, now onto episode II. To open or close the vent above the windshield I created a hinged flap out of the same Alucobond material as the roof. It works much like a sun visor, with adjustable friction hinges such that it stays where you put it. Here, you see the vents blocked:  And here, you see it with the vents open:  I have a large convex (wide angle view) mirror mounted onto the Essex upper frame. There is some bracing involved to tame the vibration of the mirror:  For those days when the wind in the hair feeling is appropriate, the window tilts up. This affords full air flow through the window frame opening. The stock window tilts up rather more than you see it here. I have put restraint cables across the lifting struts to reduce the upward travel, such that the window stops when still canted slightly downward. This is especially nice for those warm but rainy days, as it keeps the rain out, even while moving at a decent clip. Driving in the rain with a windshield can be a visibility pain, even with wipers running. With the window open, visiblility is perfect as it can be.  Here in Oregon, contending with the rain can be just as important as not choking in the dust. There are indeed those rare perfect days when it is still damp on the ground but not pouring down rain. I'm looking forward to that season here. | |
|
| | |
Firefighter
Posts : 1337
Join date : 2013-03-10
Location : Arkansas
| | Subject: Re: Dealing with the Dust Devil behind you Sun May 26, 2013 10:57 pm | |
| VERY nicely done ! Brilliant as usual Steve ! | |
|
| | |
SteveS
Posts : 430
Join date : 2013-03-10
Age : 77
Location : Portland, OR
| | Subject: Re: Dealing with the Dust Devil behind you Sun May 26, 2013 11:05 pm | |
| It is still a work in progress. I hope to put an LED lightbar underneath that front roof overhang, when I stumble on a goodly wad of cash, and also box it in a bit. I need to get rid of those sharp points at the forward corners of the roof before I stab some poor animal as I come barreling around a corner  | |
|
| | |
CUSTOMIZEDRHINO13
Posts : 1268
Join date : 2013-03-26
Age : 26
Location : Mariposa, CA
| | Subject: Re: Dealing with the Dust Devil behind you Mon May 27, 2013 1:24 am | |
| Great job Steve!! | |
|
| | |
ASPENDELLROVER

Posts : 1638
Join date : 2013-03-10
Age : 51
Location : CA
| | Subject: Re: Dealing with the Dust Devil behind you Mon May 27, 2013 2:01 am | |
| looks like a side business, kinda like JBS.... | |
|
| | |
REDRHINO64

Posts : 1649
Join date : 2013-03-10
Age : 59
Location : Asheboro N.C./Mountain Top West By God Virginia
| | Subject: Re: Dealing with the Dust Devil behind you Mon May 27, 2013 8:24 am | |
| | |
|
| | |
WV Hot Rod Rhino
Admin

Posts : 2682
Join date : 2013-03-10
Age : 57
Location : Mt. Hope, WV
| | Subject: Re: Dealing with the Dust Devil behind you Mon May 27, 2013 9:37 am | |
| nice!!!  | |
|
| | |
honda450sfm

Posts : 194
Join date : 2013-03-21
Location : Calgary CAN
| | Subject: Re: Dealing with the Dust Devil behind you Mon May 27, 2013 11:45 pm | |
| | |
|
| | |
SteveS
Posts : 430
Join date : 2013-03-10
Age : 77
Location : Portland, OR
| | Subject: Re: Dealing with the Dust Devil behind you Tue May 28, 2013 12:04 am | |
| Thanks, all.
Well, I just ordered a set of spot and flood LED's to stuff in there. Then maybe I can finish it all up, nice and proper.
I'll be plastering you with more on this dust abatement stuff as time goes on. It seems that it took me years to get it all worked out, so it ought to take me years to talk about it all, eh? | |
|
| | |
SteveS
Posts : 430
Join date : 2013-03-10
Age : 77
Location : Portland, OR
| | Subject: Re: Dealing with the Dust Devil behind you Tue Jul 02, 2013 12:29 am | |
| "Dealing with the Dust Devil behind you" Episode III Well, the Eagle-Eyed Firefighter caught a glimpse of something in one of those previous photos. It seems that he is interested in the quadruple OOOOOught buckshot holes in my firewall :-) These episodes are not in any chronological order, so you will just have to take them as they come, just like any good SciFi series. ......With that, we launch Episode III...... Somewhere along the way, I realized that dust was coating the floorboards, console and my legs, even with the window wide open. It seemed obvious that the open sides and closed front end of the Rhino was creating a low pressure region down low down in the cab. I sez to myself, "Let some air in".... My winter self sez, "You will regret it"..... The Dillema rears it's ugly horns and I whip out my Red Cape to do battle... Where is JBS coozie? It is a Hot evening and I dont have one to shield my beverage. JAMES!!! Enough jabber, the pictures please... Template: Fabricated a template to drill pilot holes in firewall panel. This is made of AlucoBond as was the roof in Episode 1.  Punch Holes: Enlarged holes as needed. The big holes were done with a chassis punch, using the Armstrong method. BFWrench.  Backup Plate: Built a backup plate using the same AlucoBond material. The firewall is pretty flimsy after you riddle it with holes.  Door Closed: Here you see the flapper door. I used the same friction hinges as used in Episode II  Door Open: Here you see sticky back foam tape for gasketing. Not shown is a thumbscrew to lock the door down.  Well, there is tonight's show. Time for me to get the beer back out of the Fridge..... JAMES!!!! A coozie?  | |
|
| | |
CUSTOMIZEDRHINO13
Posts : 1268
Join date : 2013-03-26
Age : 26
Location : Mariposa, CA
| | Subject: Re: Dealing with the Dust Devil behind you Tue Jul 02, 2013 2:42 am | |
| Nice work Steve!!! It will help get that hot air outa there to! | |
|
| | |
T.Rhino
Posts : 1469
Join date : 2013-03-10
Age : 50
Location : Wayne county kenova WV
| | Subject: Re: Dealing with the Dust Devil behind you Tue Jul 02, 2013 8:30 am | |
| I love these episodes they always have me dying to here the next one. Good stuff again Steve. Thanks. | |
|
| | |
Firefighter
Posts : 1337
Join date : 2013-03-10
Location : Arkansas
| | Subject: Re: Dealing with the Dust Devil behind you Tue Jul 02, 2013 10:00 am | |
| VERY well done my friend ! You even incorporated a seal on the door. Two coozies for You !!! HAHA
Thanks a bunch Steve ! | |
|
| | |
WV Hot Rod Rhino
Admin
Posts : 2682
Join date : 2013-03-10
Age : 57
Location : Mt. Hope, WV
| | Subject: Re: Dealing with the Dust Devil behind you Tue Jul 02, 2013 10:15 am | |
| | |
|
| | |
Sponsored content
| | Subject: Re: Dealing with the Dust Devil behind you | |
| |
|
| | |
| | Dealing with the Dust Devil behind you | |
|